02/14/2018
Must-Knows and Basics for Trekking Torres del Paine
- If not coming from Argentina, most people will fly into Punta Arenas airport in the deep south of Chile. From there they will catch a bus to Puerto Natales, and continue onto Torres del Paine via another bus. Tickets can be purchased ahead of time online (there are multiple companies, I used Bus Sur). From Puerto Natales, leave on the 7:30 am bus to start your trek early. It takes 2.5 hours to get to Torres del Paine, and then you have to wait in a line to sign in and register!

Starting the O-trek - Allocate a full day in Puerto Natales before starting your hike, to account for delayed flights, purchasing extra or last-minute supplies, and attending the 11:00 or 3:00 trekking briefings at erratic rock hostel.
- BRING CASH! You will need it for shuttles within the park, and mini-shops at each campsite (not just for treats, but for extra camp fuel or bandages if necessary).
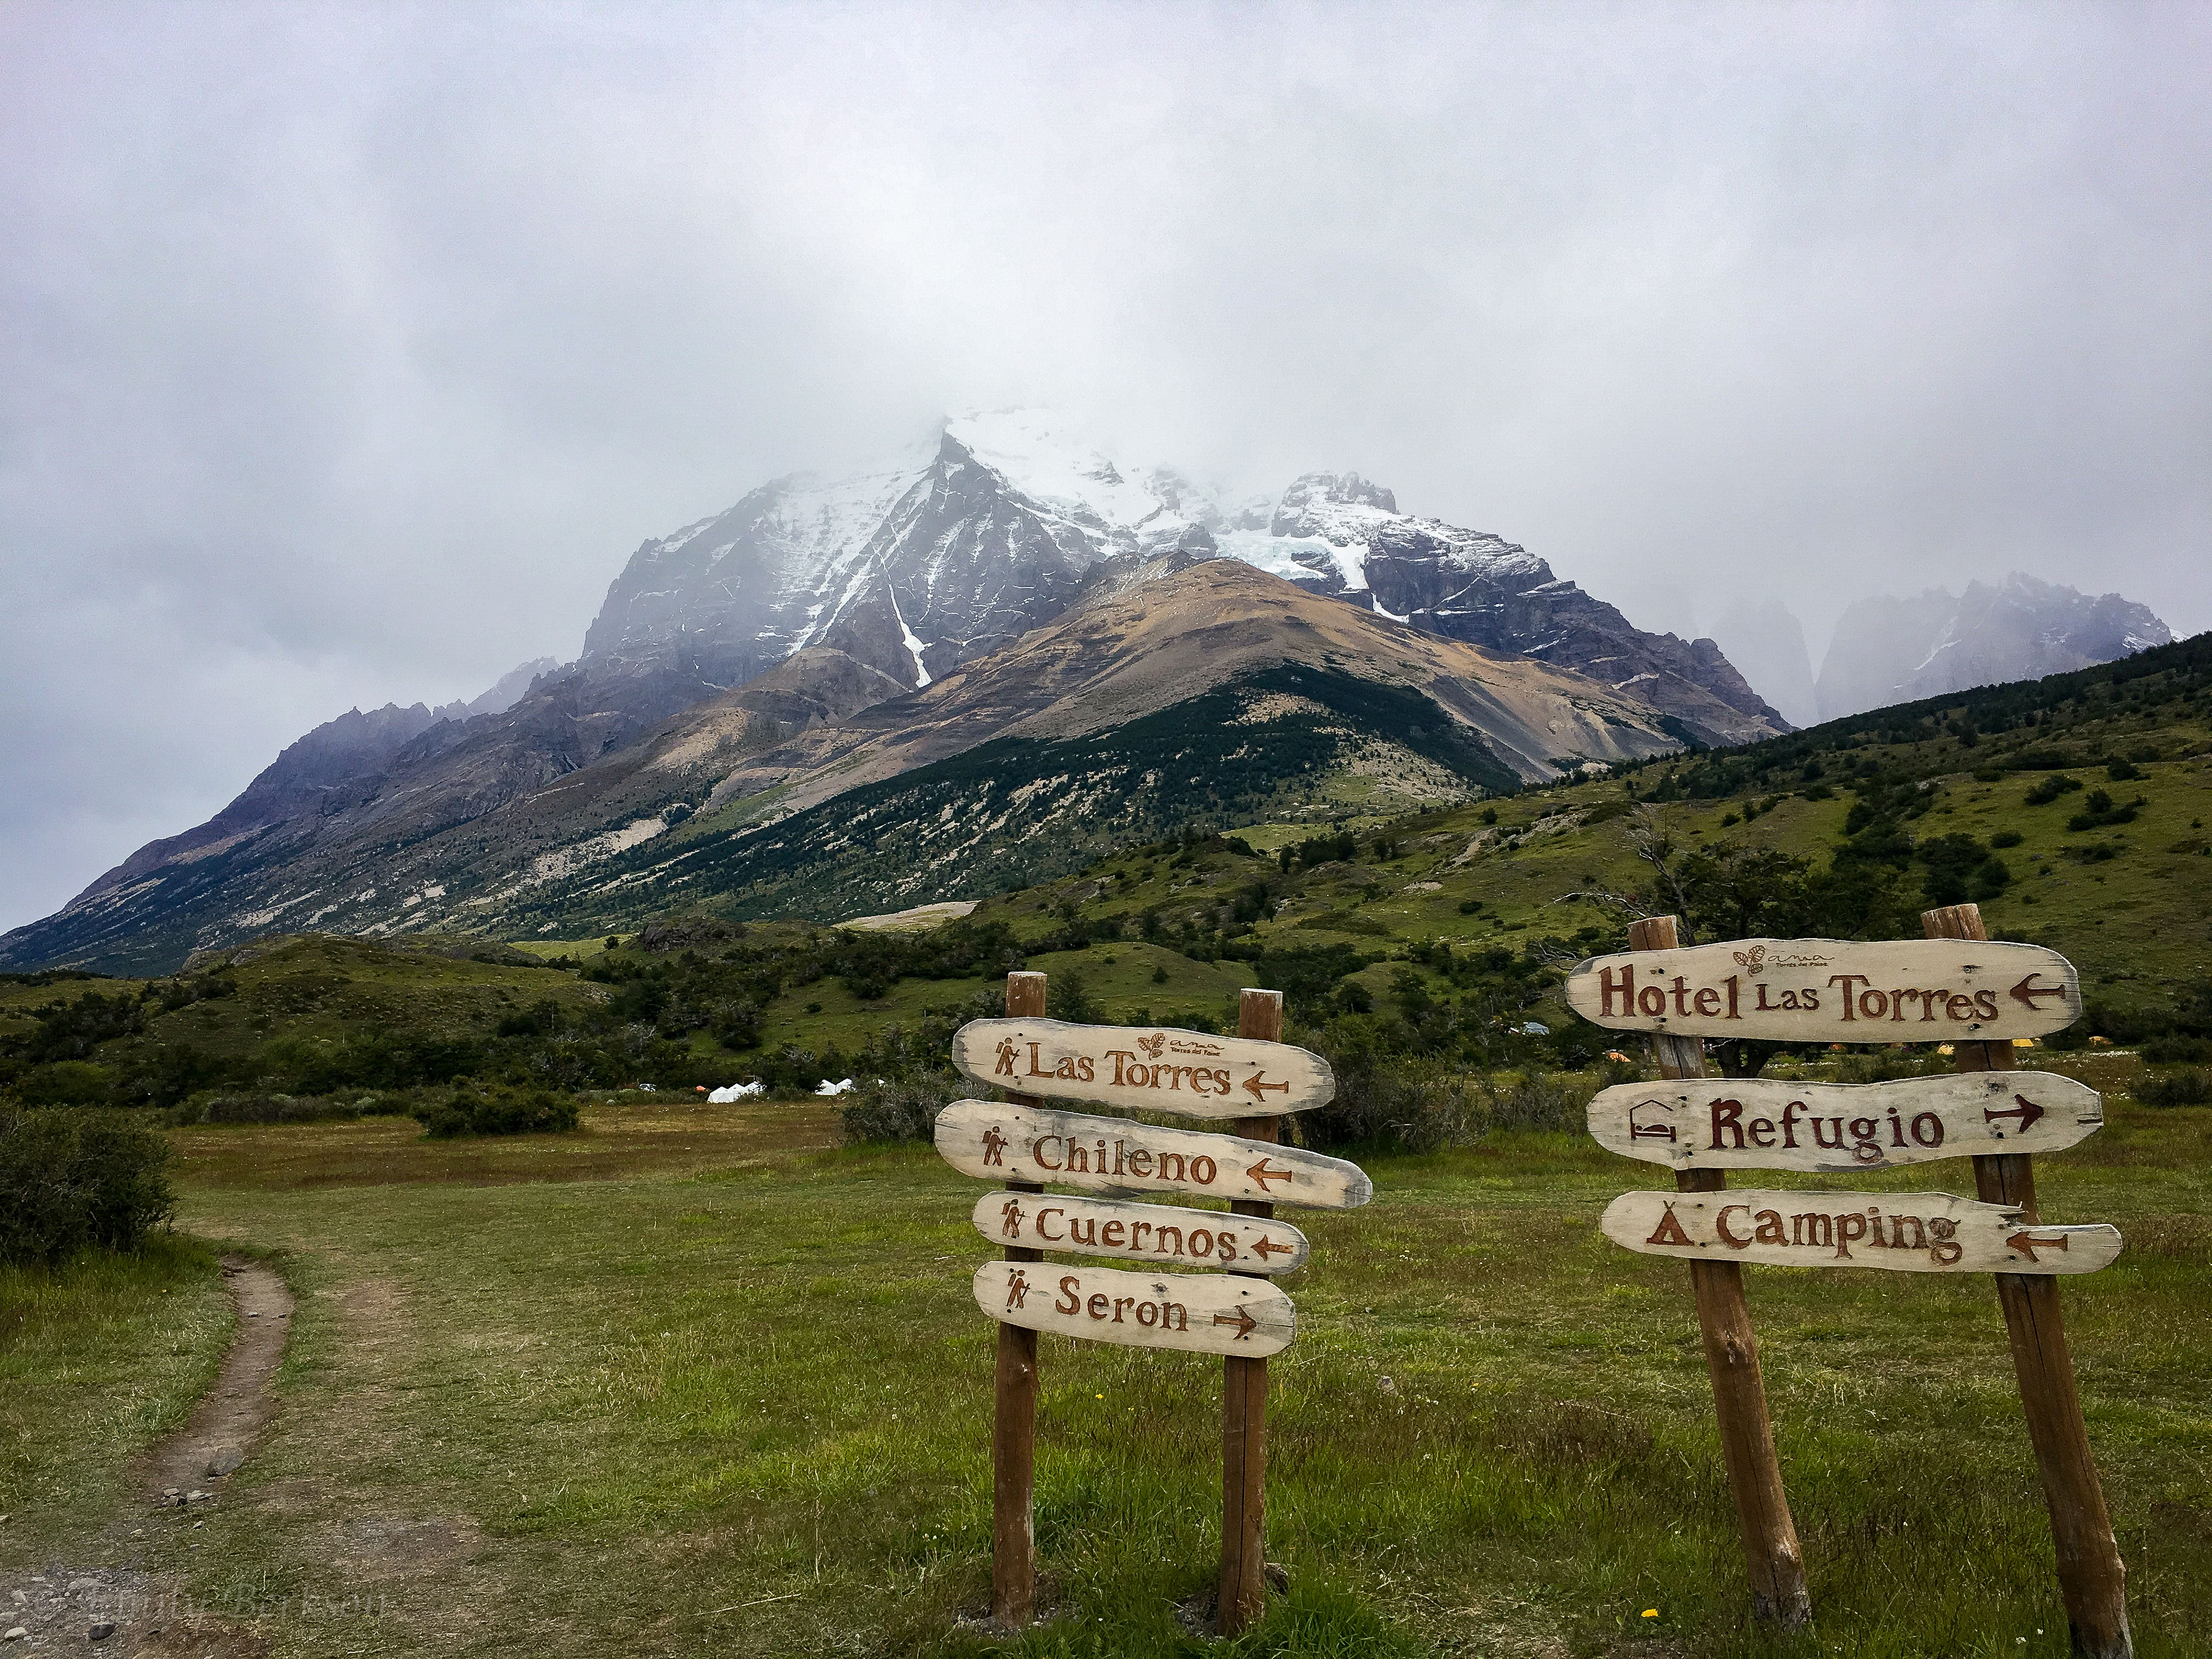
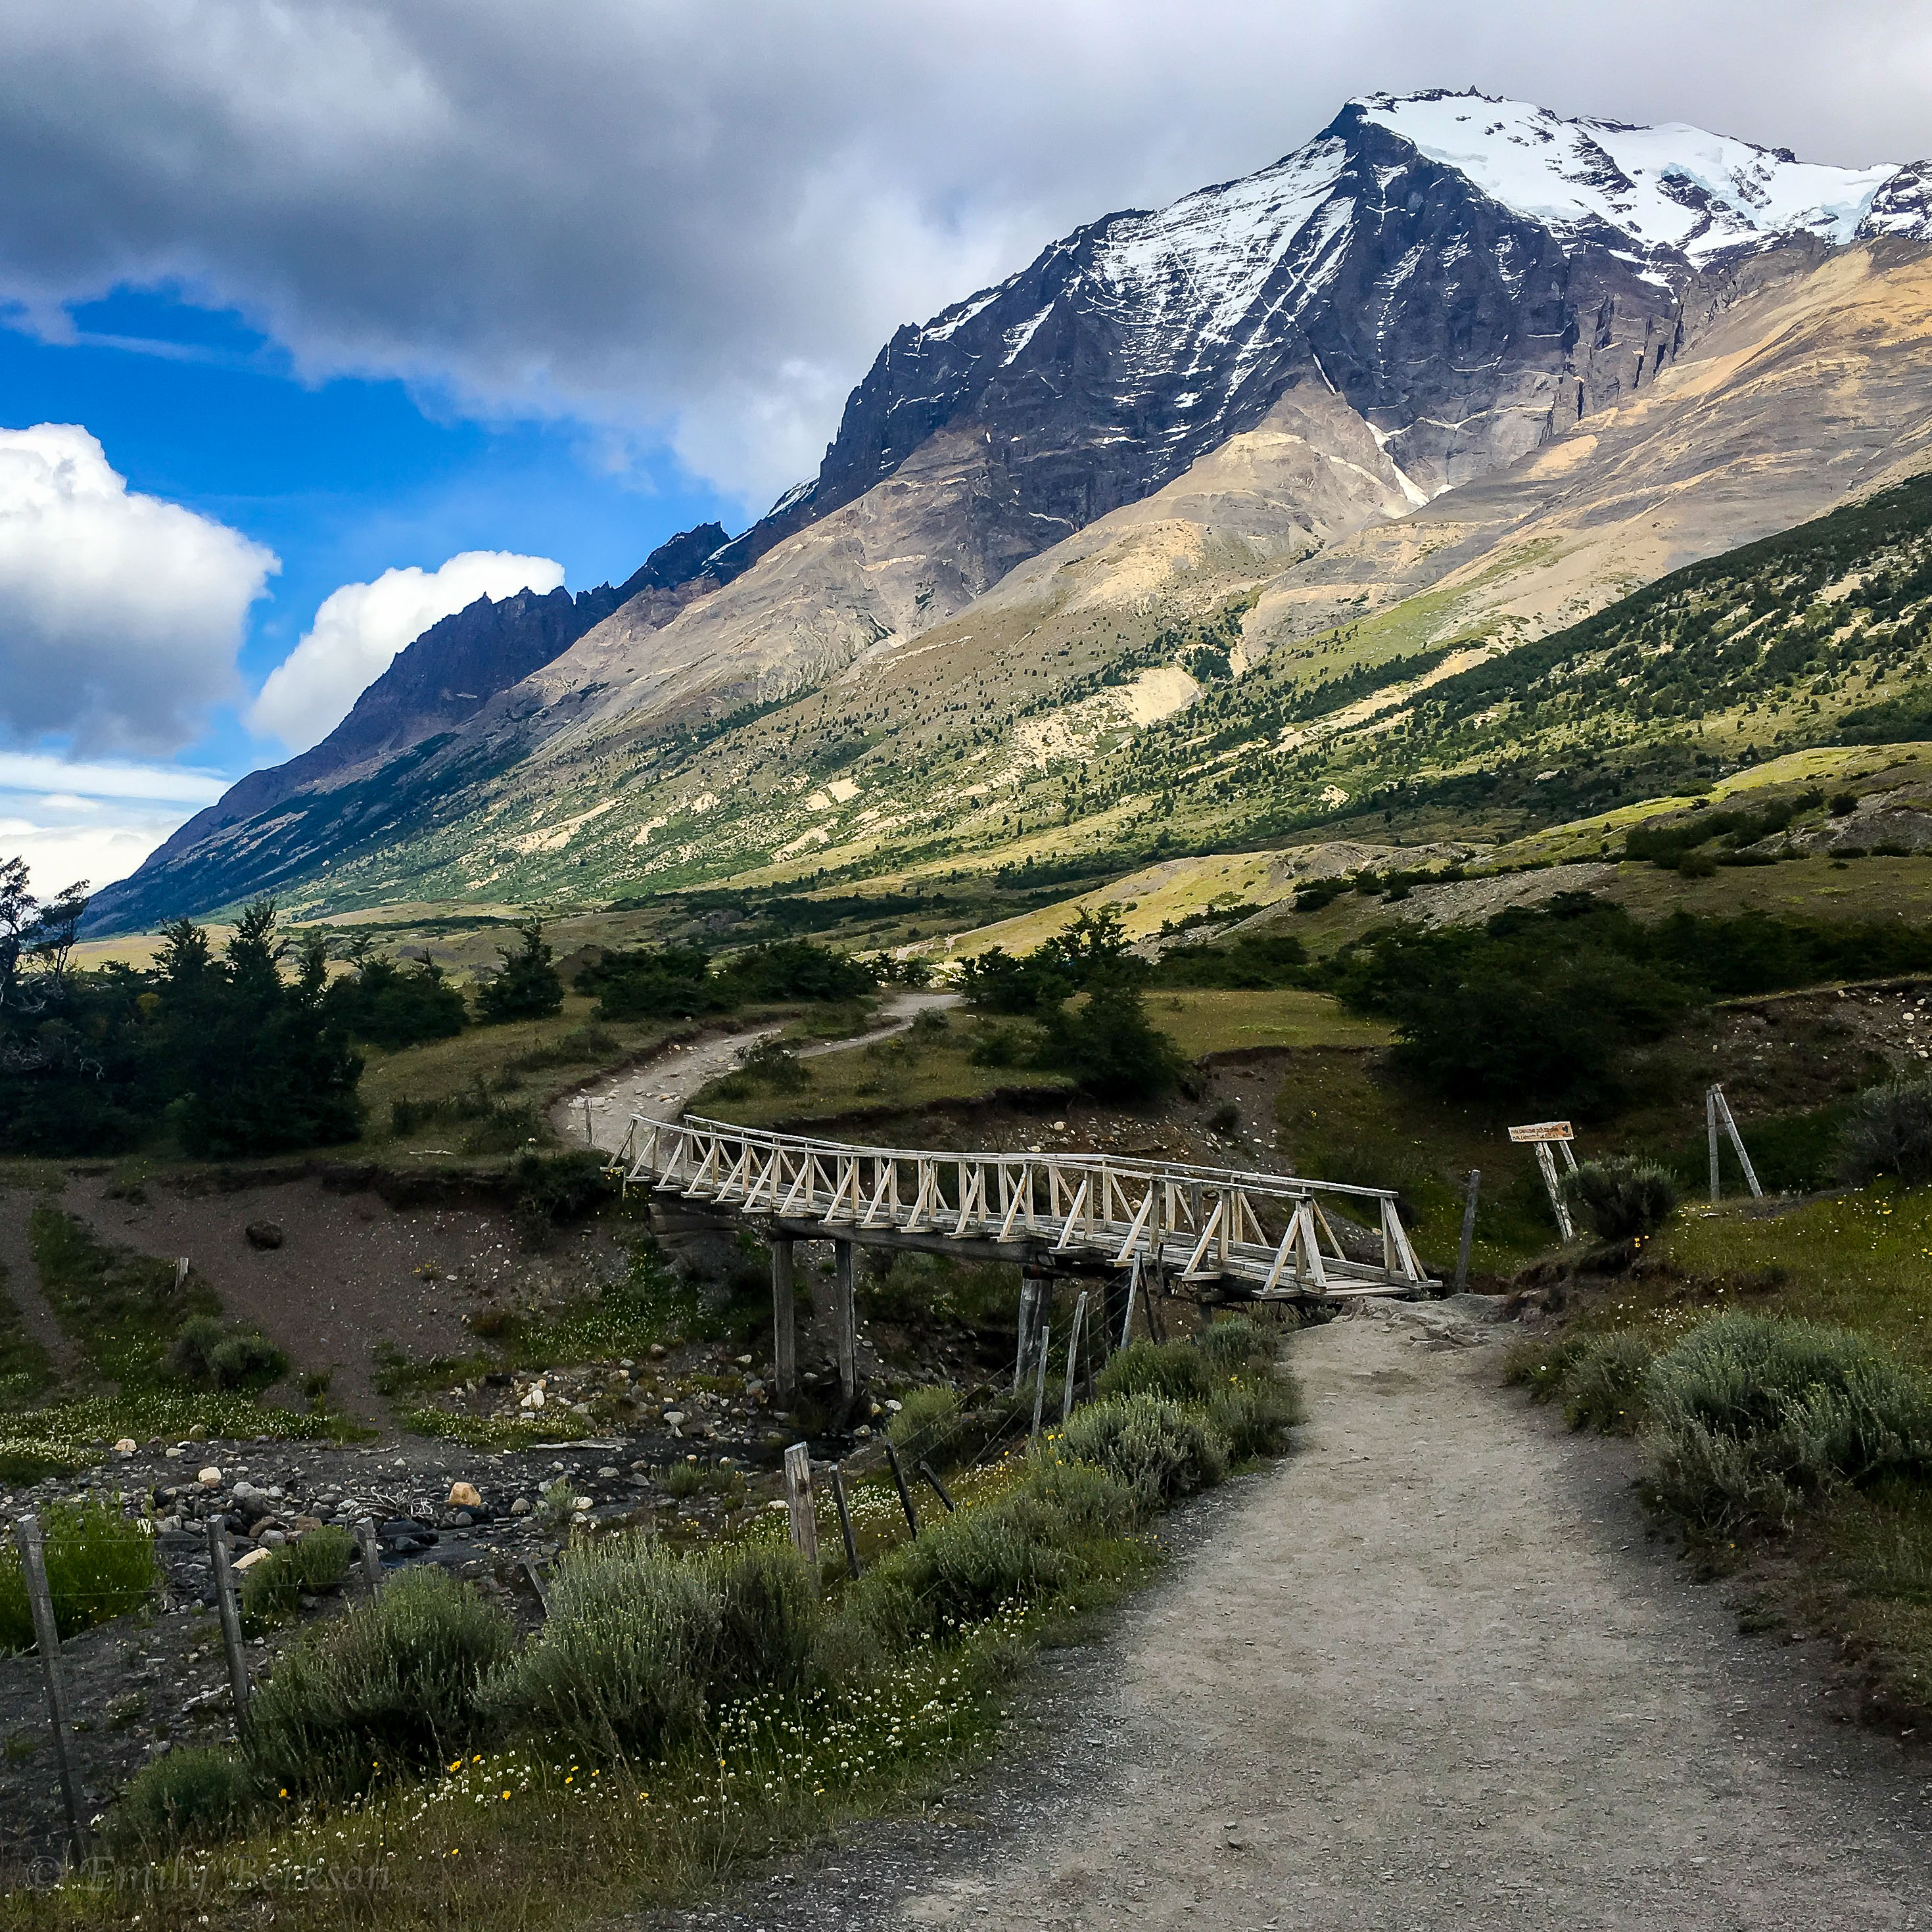
- There are two major treks: the W-trek, which makes a W-shape through the front of the park, and the O-trek (or circuit), which completes a loop around the backside of the park. The W-trek can be done entirely staying at refugios, and modern amenities are much easier to come by, whereas doing the complete circuit is the only way to see some of the stunning sights on the backside of the park. The “Q” combines the middle point of the W with the circuit trek. The circuit trek is only supposed to be done counter-clockwise. I took 7 nights and 8 days to complete the O-trek – a pretty standard, moderate pace with plenty of time to see everything along the trail – but there is SO much to see in the park in addition to these two treks!

8 days later, completion - Campsites must be reserved in advance, and make sure you do so early. (I got lucky reserving in November for a January trek, but September/October are even better times to reserve.) There are checkpoints in the backside of the park where you must prove that you have reservations for a campsite. (Another reason to allocate a full day in Puerto Natales – you don’t want your reservations to get screwed up by missing a flight or bus!) There are free park-run campsites and two companies operating campsites and refugios within the park. I used a mixture of these, and splurged for two indoor nights. Also beware that some people will reserve multiple park campsites on the same night so they can sleep wherever they please. I found that pretty inconsiderate, but as a result, park campsites generally had extra availability when I was there, and would let a few people adjust their plans to overnight there. (Beware park campsite amenities are sparse.)
- You will encounter all types of weather in Patagonia. I hiked in short sleeves and high 60˚F temperatures, and through high winds and snow atop John Gardner Pass. The winds are no joke; they destroyed my tent on the 6th night and nearly knocked me over several times.
- Speaking of John Gardner Pass, plan to start the climb as early as possible on the day you cross (see elevation chart below). Although I had decent weather, I hear that park rangers will turn you back if the weather takes a turn for the worse in the afternoon.
- Nights are cold, even in the summer. I didn’t test my shelter and sleeping equipment enough under similar weather conditions, and I spent most of my trip being cold when I wasn’t moving.
- USE SUNSCREEN! I forgot to apply it one day and spent the rest of my three-week trip trying to recover.
Getting There
After 30 hours of traveling from Washington, D.C. to Panama City to Santiago to Punta Arenas to Puerto Natales, I got a quick rest before heading into Torres del Paine National Park. From landing in Punta Arenas, I took a (somewhat expensive) taxi into the city and caught an inexpensive bus to Puerto Natales. My bus stopped by the airport on the way out of the city, so I probably could have planned that better if I had reserved tickets in advance.
In Puerto Natales I spent the night at Hotel Temauken, which was a bit outside of the main town, but a short walk from Rodoviario Puerto Natales Bus Station. Before leaving the bus station, I bought my tickets to leave for Torres del Paine bright and early next morning. From the hotel it was a little less than a mile to Erratic Rock Hostel, which gives free Patagonia trekking briefings at 11:00 and 3:00. I got in too late to attend one, but wish I had the opportunity. In addition to helping trekkers find travel buddies, they rent equipment and give a rundown on everything you should know before starting your hike:
“Affectionately nick-named ‘the 3 o’clock talk’, the info sessions cover details about Torres del Paine, weather, equipment, trail food, packing, refugios, trekking, climbing, transportation, the catamaran and anything else you can think of for Torres del Paine and trekking in Patagonia. Join our guides everyday at 3pm for a cup of coffee and the facts about how Patagonia is put together. What started as just ‘sit-down’ advice sessions with travellers staying at the hostel, has now turned into a vital 1.5 hour visit to the erratic rock Base Camp.” — erratic rock
I grabbed a quick pizza dinner (my last sit-down meal for awhile!) and of course only realized that the restaurant didn’t accept debit/credit cards once I was halfway through the pizza. A very kind couple paid for my dinner, and I spent the next eight days trying to pay that forward, sharing my camping supplies and treats with everyone I came across.
After dinner I walked up to the Unimarc grocery store to stock up on last minute snacks, and grabbed some stove fuel from a nearby camping store. A lot of stores were beginning to shut down in the early evening and I got lucky with shopping. In retrospect, I probably should have planned a full day in Puerto Natales to prepare for the trek.
When all was said and done, I managed to prepare myself for my trek with just a couple evening hours in Puerto Natales. At 7:30am the next morning, I was off, and eager to enter the park. The entrance fee was CLP $21.000, thankfully payable by card, but I unfortunately still didn’t have cash to take the shuttle from the entrance (Guarderia Laguna Amarga) to the real start of the trek at Refugio Las Torres. This added another 7(!) kilometers onto my first day of hiking, and overall wasn’t really necessary. There were of course beautiful views of the park, but the hiking was along a gravel road and all of the shuttle buses kicking dust up into your face wasn’t the most pleasant way to spend the morning.
Even with the stress of rushing into the park, not having cash, and walking an extra 7 km on the first day, I was there! This was my first real solo trip in a non-English-speaking country, and my first backpacking trip, and I was more exhilarated than ever. The next 8 days were definitely life-changing, not just because of the beauty, but because of the challenge (both mentally and physically).
Trekking & Lodging
There are enough campsites along the O-trek that no single day is too strenuous (if you are prepared). I planned a 7-day, 8-night trek to go at a leisurely pace and enjoy the park as much as possible. Most people in my hiking group seemed to take about the same about of time. (I say “hiking group” because park rules mandate you hike the circuit in a counter-clockwise fashion, so you really got friendly with the people who started on the same day as you.) I did meet one woman, a park guide from Utah and Alaska, who was doing the entire backside of the park in 2 days! At the time it blew my mind, but she was very fit and blazing past almost everyone else on the trail.
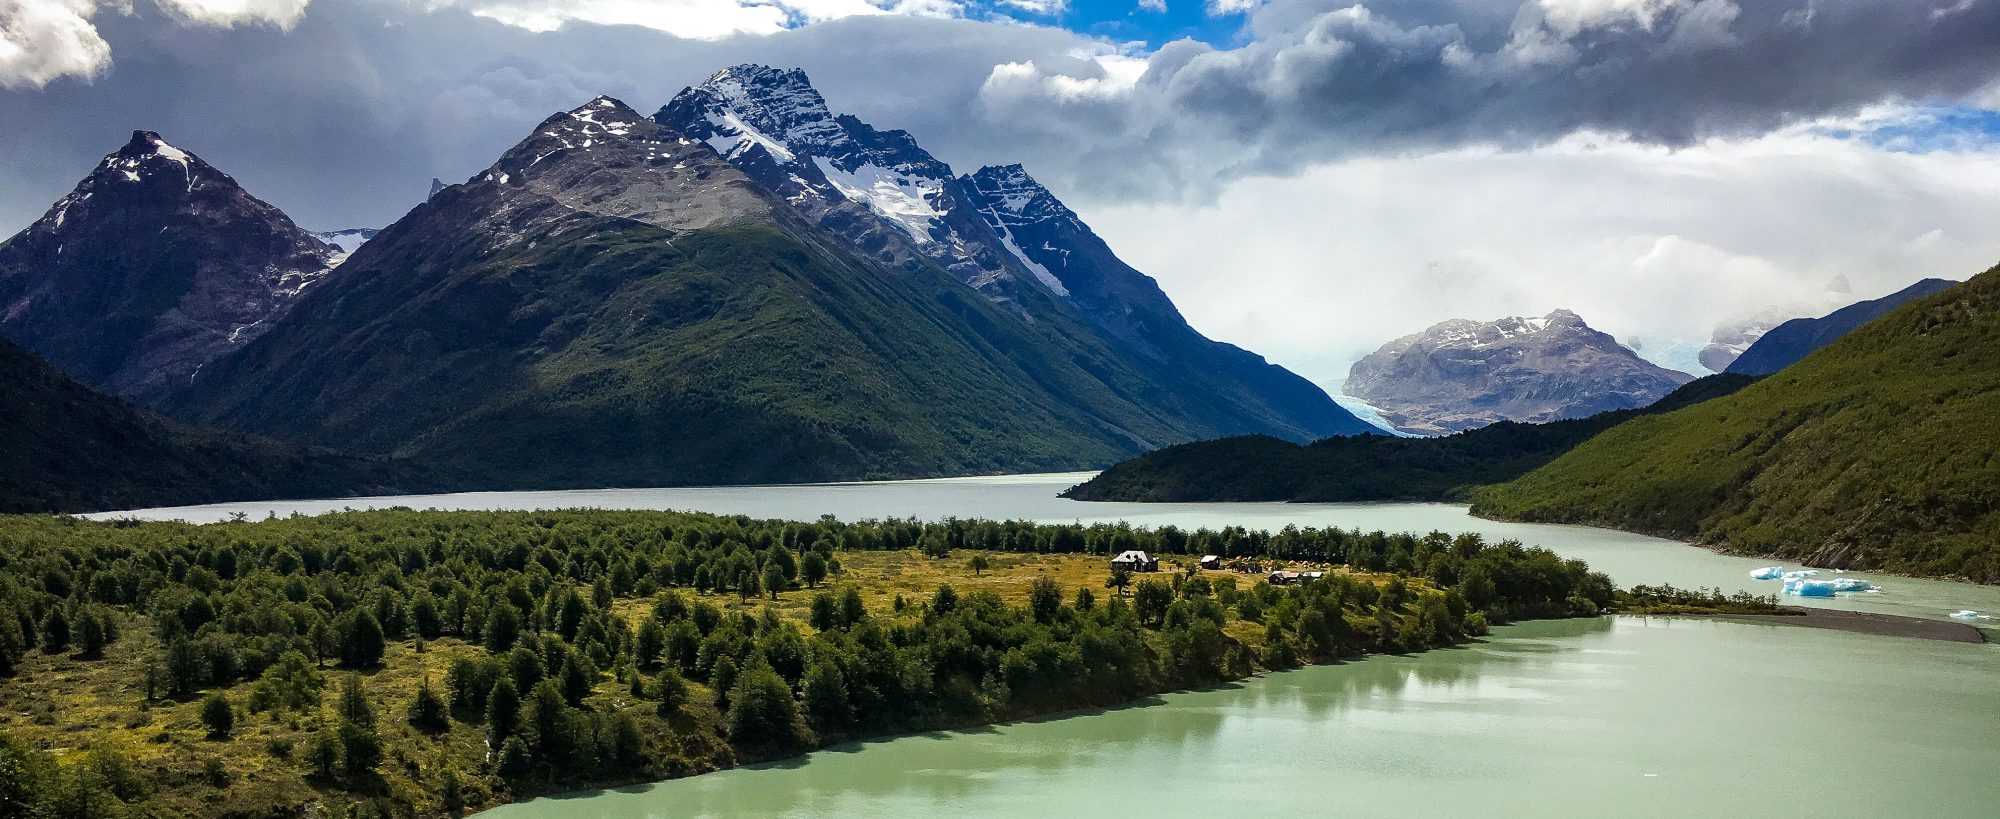
My full route is listed below, along with a map highlighting where I stayed, and a chart from the park pamphlet showing elevation gain along the trek.
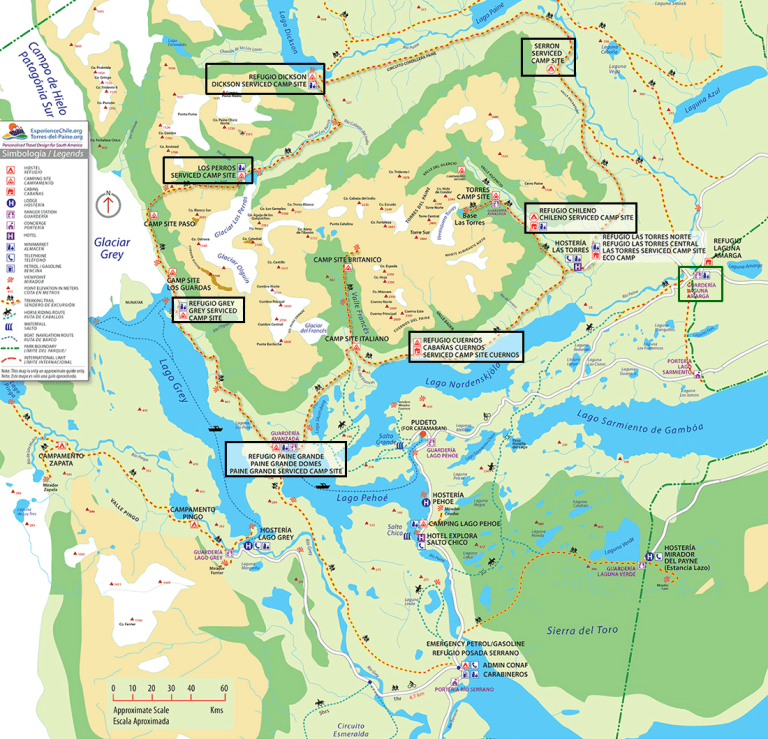
My camping experience was limited before this trip, so I treated myself to two nights in refugios (very basic cabin-type accommodations, shared with multiple other people), and arranged for five nights of camping. You can complete the entire W-trek staying solely in refugios and lodges, but you’ll almost certainly have to commit to at least one night of camping at Campamento Los Perros if you do the circuit. The table below includes links to reservation websites for the campsites and refugios that I used, but beware there are a couple other options I am not mentioning here. I used fantastico sur for three nights of my trip and Vertice Patagonia for the other four.
| Campsite | Distance [km] | Max Elevation Difference [m] (Estimated) |
|---|---|---|
| Las Torres Hotel –> Campamento Serón | 13 | +200 |
| Campamento Serón –> Refugio Dickson | 18 | +150 |
| Refugio Dickson –> Campamento Los Perros | 11.8 | +400 |
| Campamento Los Perros –> Campamento Grey | 15 | -1200 (+600) |
| Campamento Grey –> Refugio Paine Grande | 11 | +200 |
| Refugio Paine Grande –> Campamento Los Cuernos | 12.5 | +200 |
| Campamento Los Cuernos –> Campamento Chileno | *~15 | +500 |
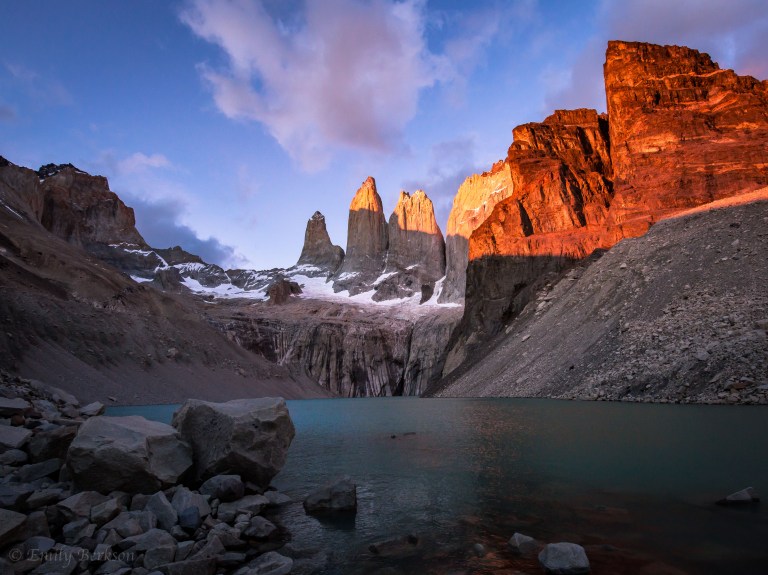
| **Campamento Chileno–> Base de las Torres | 4.4 | +400 |
| **Base de las Torres –> Las Torres Hotel | 9.4 | -750 |
| TOTAL DISTANCE | 110.1 |
* Estimated distance because there is an unmeasured shortcut bypassing Las Torres Hotel en route from Chileno to Cuernos.
** Final day trekking; no overnights included.
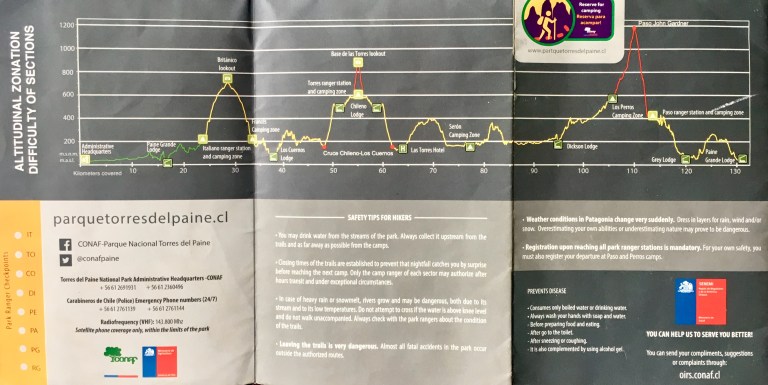
As mentioned above, anyone planning to cross John Gardner Pass should start as early as possible. I left Campamento Los Perros at 6am on the day of my crossing (also because I was a very slow hiker), and encountered strong winds and snow flurries at the summit. And although the climb up to the pass was a killer, it was the 1200m descent that left me struggling to walk the next day.
Equipment


* In the above picture, the upper part of my pack should have been closer to my head; I adjusted this later on.
Finally, my equipment. I studied long and hard to get the lightest pack possible, and up until about 15 minutes before I left my house to go to the airport, it was looking pretty promising. The last minute grab of everything I thought I might need proved to be my downfall of carrying probably much more weight than necessary. Also, lugging around almost 6 extra pounds of camera equipment certainly didn’t help my case. However, looking back, I used almost every single thing I brought. And the things I didn’t use I wouldn’t be willing to sacrifice on future hikes (i.e. waterproof matches, spare stove fuel, first aid kit, etc.) In addition, I’ll cut myself a little slack because I was packing for three weeks in Chile, not just this trek. After the trek I used LighterPack to track all of my weight and make informed decisions on future backpacking trips.
For a second trip, the only thing I would change is my insulation. Even though it was Patagonian “summer,” I was still cold most of the time. I definitely would have appreciated a thicker jacket and a heavier sleeping bag for the nights that dipped down to 40˚F.
| Item Name | Category | Description | Quantity | Weight | Unit |
| Torres Del Paine Trekking Map | Navigation | waterproof, tear-resistant; topological; 1:80 000; trails with walking times, hotels, campsites & shelters | 1 | 3.2 | ounce |
| Spanish/English Phrasebook | Navigation | 1 | 6 | ounce | |
| Trekking Poles | Navigation | Black Diamond Trail Trekking Poles | 1 | 17 | ounce |
| Sunscreen | Sun Protection | Banana Boat Sport Performance Sunscreen Lotion 30 SPF | 1 | 1 | ounce |
| Sunglasses | Sun Protection | 1 | 0.6 | ounce | |
| Lotion | Sun Protection | 1 | 2.5 | ounce | |
| Jacket | Clothing/Insulation | Patagonia Women’s Nano Puff Ultralight jacket; non-breathable, for campsite wear | 1 | 10 | ounce |
| Jacket | Clothing/Insulation | Merrell Quentin Jacket | 1 | 13.5 | ounce |
| Rain Coat | Clothing/Insulation | Columbia WOMEN’S EVAPOURATION™ JACKET | 1 | 13.8 | ounce |
| Leggings | Clothing/Insulation | Under Armour | 2 | 6.7 | ounce |
| Thermal Leggings | Clothing/Insulation | Under Armour | 1 | 6.4 | ounce |
| Hiking Pants | Clothing/Insulation | Northface WOMEN’S APHRODITE 2.0 PANTS | 1 | 8.3 | ounce |
| Waterproof Pants | Clothing/Insulation | Columbia Storm Surge Rain Pants | 1 | 9.6 | ounce |
| Long-sleeved Shirt | Clothing/Insulation | Icebreaker Women’s Oasis Long Sleeve Crewe Top | 2 | 7.8 | ounce |
| Short-sleeved Shirt | Clothing/Insulation | Minus33 Merino Wool Women’s Appalachia Lightweight Short Sleeve Crew | 1 | 5.3 | ounce |
| Underwear | Clothing/Insulation | 4 | 1.5 | ounce | |
| Sports Bras | Clothing/Insulation | 3 | 2.3 | ounce | |
| Socks | Clothing/Insulation | Smartwool Hiking Socks | 3 | 3.1 | ounce |
| Gloves | Clothing/Insulation | 1 | 1.7 | ounce | |
| Hat | Clothing/Insulation | 1 | 2.8 | ounce | |
| Hiking Boots | Clothing/Insulation | Vasque Women’s Talus Trek UltraDry Hiking Boot | 1 | 3.1 | pound |
| Sandals | Clothing/Insulation | Keen WOMEN’S WHISPER | 1 | 1.2 | pound |
| Headlamp | Illumination | 1 | 4.2 | ounce | |
| Batteries | Illumination | 2 spare | 1 | 1 | ounce |
| First Aid Kit | First Aid Supplies | Adventure Medical Kits Ultralight and Watertight .9 First Aid Kit | 1 | 12 | ounce |
| Athletic Tape | First Aid Supplies | Mueller Sports M Tape | 1 | 4 | ounce |
| Excedrin | First Aid Supplies | Excedrin Extra Strength 50 Caplets | 1 | 1.7 | ounce |
| Tums | First Aid Supplies | TUMS Extra Strength Assorted Fruit Antacid Chewable Tablets for Heartburn Relief, 12 count | 1 | 1.1 | ounce |
| Bug Spray | First Aid Supplies | Repel 100 Insect Repellent | 1 | 4 | ounce |
| Stove | Cooking/Food | Jetboil Flash Cooking System | 1 | 15.3 | ounce |
| Spork | Cooking/Food | Snow Peak Titanium Spork | 1 | 0.6 | ounce |
| Waterproof matches | Cooking/Food | UCO Stormproof Match Kit | 1 | 1.7 | ounce |
| Fuel | Cooking/Food | Jetboil Jetpower Fuel | 2 | 8.1 | ounce |
| Instant Oatmeal | Cooking/Food | 4 | 2.4 | ounce | |
| Freeze Dried Food | Cooking/Food | Alpine Aire, Mountain House, etc. | 10 | 5 | ounce |
| Peanuts | Cooking/Food | 3 | 1.8 | ounce | |
| Chocolate | Cooking/Food | 3 | 1.6 | ounce | |
| Water Bottle | Hydration | LifeStraw Go Water Filter Bottle with 2-Stage Integrated Filter Straw | 1 | 5.9 | ounce |
| Water Bladders | Hydration | Vapur Element Water Bottle | 2 | 1.4 | ounce |
| Water Filtration | Hydration | TAC-H2O Refill – 100 Aquatab Water Purification Tablets | 1 | 0.3 | ounce |
| Backpack | Backpacks and Sacks | Osprey Atmos AG 50 Pack | 1 | 4 | pound |
| Daypack | Backpacks and Sacks | Osprey Daylite Daypack | 1 | 1 | pound |
| Waterproof Sack | Backpacks and Sacks | Sea to Summit Lightweight Dry Sack – 2L | 1 | 1.3 | ounce |
| Waterproof Sack | Backpacks and Sacks | Sea to Summit Lightweight Dry Sack – 8L | 1 | 2.1 | ounce |
| Waterproof Sack | Backpacks and Sacks | Sea to Summit Lightweight Dry Sack – 8L | 1 | 4.2 | ounce |
| Tent | Shelter/Sleeping | Big Agnes Copper Spur HV UL 2 mtnGLO Tent | 1 | 50 | ounce |
| Footprint | Shelter/Sleeping | Big Agnes Copper Spur HV UL 2 Footprint | 1 | 6 | ounce |
| Sleeping Pad | Shelter/Sleeping | Therm-a-Rest ProLite Plus Mattress – Regular | 1 | 1.2 | pound |
| Sleeping Bag | Shelter/Sleeping | Sea To Summit Spark Sp II | 1 | 16.4 | ounce |
| Sleeping Bag Liner | Shelter/Sleeping | Sea To Summit Thermolite® Reactor Liner | 1 | 8.7 | ounce |
| Pillow | Shelter/Sleeping | Sea To Summit Aeros Pillow Premium | 1 | 2.8 | ounce |
| Body Soap | Hygeine | Sea to Summit Wilderness Wash Soap | 1 | 8.5 | ounce |
| Hair Brush | Hygeine | Folding Compact Hair Brush w/ Mirror | 1 | 1.6 | ounce |
| Toothbrush | Hygeine | Colgate Travel Folding Soft Toothbrush | 1 | 0.7 | ounce |
| Toothpaste | Hygeine | Crest Complete Whitening Scope Minty Toothpaste | 1 | 0.9 | ounce |
| Body Towel | Hygeine | PackTowl Personal Body Towel – Body | 1 | 6.4 | ounce |
| Face Towel | Hygeine | Packtowl Personal Packtowl – Small | 1 | 0.7 | ounce |
| Napkins | Hygeine | 1 | 1 | ounce | |
| Deodorant | Hygeine | 1 | 4 | ounce | |
| Wide Angle Lens | Camera/Electronics | Tamron A012E SP 15-30mm F2.8 | 1 | 2.43 | pound |
| Battery | Camera/Electronics | Canon Battery Pack LP-E6N | 2 | 0.1 | pound |
| Battery Charger | Camera/Electronics | 1 | 4.1 | ounce | |
| Camera | Camera/Electronics | Canon EOS 5D Mark III | 1 | 2.09 | pound |
| Telephoto Lens | Camera/Electronics | EF 75-300mm f/4-5.6 III | 1 | 1.1 | pound |
| Cell Phone | Camera/Electronics | iPhone 6 | 1 | 6.6 | ounce |
| Cell Phone Charger | Camera/Electronics | 1 | 3.2 | ounce | |
| Power Adaptor | Camera/Electronics | 1 | 6 | ounce |
